
Back to Index SEE ALSO:
Marketplace
Contests
Auctions
Freeskiing
Worldcup
Ski Resorts


|
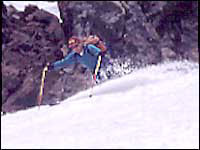 Skier: Jimmy Ludlow Location: Mt. Hood, Oregon | |
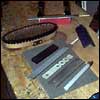 Tools of the trade | |
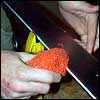
Keep the P-tex burning in a blue flame by placing it near a metal scraper. When the flame turns yellow, a carbon residue is formed which inhibits the bonding process. Slowly rotate the stick in your fingers to keep the burning end in a bulb (CAUTION: don't touch the burning end with your fingers, it is very hot). Now drip your blue flaming bulb into the hole and slightly overfill. Allow the repair to cool to room temperature before planing it back to the surface level of the base.
|
|
|
|
|
|
|
|
| "Several of my friends are diehard anti-ski maintenance, which is their prerogative and is fine with me because first one to the truck gets the good microbrew..." |
|
|
|
|
|
|
|
|
Now that the bases are repaired, the question is whether to structure or not to structure? Structure, or micro-grooves, cut diagonally and linearly in the base help to shed water out from under the base which enhances glide. Think of two sheets of glass with some water between them. The surface tension develops a vacuum when you try to pull them apart. This suction slows skis considerably in wet snow. Most high end skis come from the factory with a structured base. The best way to get a structured base is to pay, yes pay, a shop to stone grind them for the type of snow you usually glide.
Alternatively, you can do it by hand, but it's never the same. Wrap some white (white because it bonds better to the paper backing) 180 grit sand paper tightly around a file trimmed to the width of your ski tip and work tip to tail, cleaning or tearing off the build-up on the sand paper. Now use a soft brass brush to remove any particles that have decided to take up residence in your ski base. Lastly, make several tip to tail passes with some 00 scotch pads, also trimmed to the width of your ski tip. This will remove any fine base hairs formed during the structuring step.
Edge work is your next step. First run your fingertip gently along the edges to locate any burred spots and remove them with a wet stone (Arkansas stones are a personal favorite because they have a very fine particle size and are very hard). If you have not sharpened your edges in a long time, run a stone tip to tail to gently roughen the metal surface.
|
"By focusing on the quality of the work we gain a clarity of mind that distills the peacefulness with the soul..." |
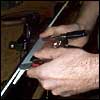
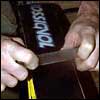
The art of filing | |
The World Cup ski technicians prefer beefy CNC machined guides because they can place virtually any abrasive tool (file or stone) of their choice and they have and will retain the precision better than the plastic models. It is a choice of quality vs. convenience. Next, use the spring clamps to hold the rasp file to your side edge bevel tool. Place the file so that the "tail always trails" the direction your working.
Removing material is done through several passes, so trying to do it in one will only damage the edge. Work tip to tail in groups of three — three passes on the tip third, three passes on the middle third and three passes on the tail third — and use the third pass to continue into the first pass of the new section while slightly overlapping each section. Always wipe the base with the shop rag between passes to prevent edge debris from being planted in your structured base. Then do two tip to tail passes to ensure an even transition between sections.
|
"For base beveling several guides are available, use only guides that locate on the same edge you are working..." |
Once complete, run the gummy stone (basically an eraser impregnated with an abrasive) tip to tail to remove the fine burr at the side and base edge plane interface. Now you have quality edge from tip to tail and questions about detuning the ski come to mind.
|
"Detuning is simply softening or dulling the edge. A sharp tip edge makes the ski behave grabby at times and hard to steer at others..." |
(the opposite of tuning)
Should detuning be done? Yes. How far back does one need to detune? It's a matter of personal preference. Okay, what is detuning? Detuning is simply softening or dulling the edge. A sharp tip edge makes the ski behave grabby at times and hard to steer at others. Like traversing a hill or skiing the back side of a mogul, a sharp tip will want to grab the hill and climb up it. Use a stone to make several passes on the edge, going only about 10 inches in from the tip and tail on both sides. When you scrape your fingernail on the dull edge, no shavings should appear as do on a sharp edge. Now give the skis one last brush to remove any edge debris from the base. Once skiing, if the ski still feels grabby, simply continue in another couple of inches toward the center until the ski performs as you like. Remember, start small and go from there, as it is easier to detune than to tune an edge.
 Scrub-a-dub dub
 | |
You should always wax your skis in a well vented area and the skis should be at room temperature. Waxing a cold ski will cause the ski to decamber momentarily and the wax will not enter the base pores as efficiently. Heat your iron to a point where the wax melts, but does not smoke. Smoke is bad for your health and tends to break down the wax. Drip the wax onto the ski and then iron in, keeping the iron moving at all times. Leaving the iron in one spot can damage the ski. After ironing, the wax on the ski should be covered completely tip to tail. With practice you will become more efficient with how much to drip on without using too much. Use a plastic mesh scrubby, like those for scrubbing pans, to remove excess wax from the sidewalls.
 Scrape excess wax
 | |
This is a lot of work, but it only needs to be done after each base grind (a couple times a year). Now the ski is ready to be waxed for the specific type of snow you will be playing on (new, old, cold-n-dry or warm-n-wet). Waxes are typically color coded to snow temperature, warm temperature=warm color, like yellow and then red and blue are for increasingly colder, dryer snow. Fluorinated waxes are designed for moist snow. Fluorocarbons are added to the hydrocarbon base wax to make it repel water, which improves the glide of the ski, but fluorinated waxes are expensive so you must weigh the cost, a box of shop wax that will last a season costs about $25 (backcountry skier), while a pure fluorinated rub on wax will cost you about $5 a run (elite racer).
|
"Fluorinated waxes are expensive so you must weigh the cost..." |
Graphite waxes are designed for cold dry snow where static, which reduces glide, becomes a factor. Major wax manufactures provide waxing charts. These are very helpful, but keep a waxing log of what the conditions were like on the hill, what you waxed, and how well it worked. This will help you select wax in the future.
Waxing is work but the benefits are definitely reaped later while out on the mountain gliding across a traverse instead of trudging. Several of my friends are diehard anti-ski maintenance, which is their prerogative and is fine with me because first one to the truck gets the good microbrew. Lastly, keep a rag handy to wipe off your skis to prevent rust formation, especially at resorts where chemicals have been thrown on the snow to keep it hard. Enjoy the ride!
Jimmy Ludlow, a physicist by trade, is an active World Cup telemark racer, USSCA Level II coach, Telemark examiner for the PSIA Intermountain region, Instructor at Park City Mountain Resort and designs performance ski accessories for the Salt Lake City based Alden Ski Innovation.
|
|